Basement excavation next to a neighboring building, a retaining wall, groundwater lowering, an old structure full of cracks: in every one of these cases someone has to answer the same question, is it moving? The way to answer with numbers is monitoring: measuring the same points many times over the course of the work and comparing each measurement with the first one.
In this guide you will see how to carry out this monitoring with a total station and adhesive reflective targets, when it is better to use a level instead of a total station, how to choose the target size, and the precautions that separate a reliable report from a pile of numbers nobody can interpret.
What settlement and displacement monitoring is
Settlement is the vertical displacement of a structure, almost always a sinking caused by the foundation or by the soil beneath it. Horizontal displacement is lateral movement: a retaining wall that tilts, a column that goes out of plumb, a facade that moves away from its alignment.
The principle is always the same:
- Baseline reading: before the work starts to have an effect (before excavation, dewatering or loading), you measure the coordinates and elevations of all points. This is the reference for everything that comes after.
- Periodic campaigns: you repeat the measurement of the same points, with the same method, at the frequency set in the monitoring plan.
- Comparison: the difference between each campaign and the baseline reading is the displacement of the point. If it exceeds the alert threshold set by the designer, the site team is notified.
Buildings next to excavations, retaining structures, foundations on soft soil and structures showing distress are the most common cases. The foundation standards and building codes of many countries require settlement monitoring in a number of situations; it is the design that defines what to measure, the limits and the frequency.
Total station or level: which one to use
The two instruments solve different parts of the problem, and many projects use both.
- Precise differential leveling (digital level with a bar-code or invar staff) is the reference for vertical settlement: it reaches fractions of a millimeter. The limitation is that the staff has to stand on each point, usually a pin anchored at the base of the column or wall.
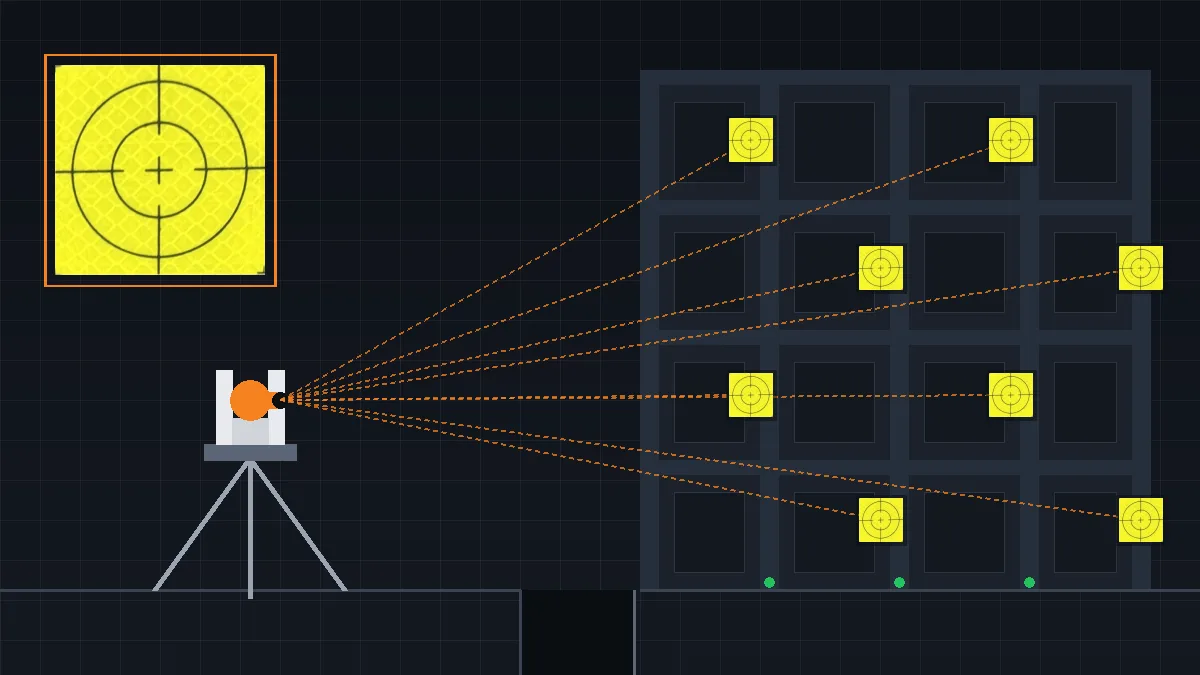
- A total station with targets measures the three coordinates (Northing, Easting and elevation) of points you cannot reach with the staff: the top of a facade, the top of a retaining wall, a column across the street. Precision is in the millimeter range and depends on the instrument, the distance and the procedure.
A common combination is to level the settlement pins at the base of the structures and use the total station for horizontal displacements and high points. To check the closure of the leveling, the differential leveling calculator works out backsights, foresights and misclosure.
Why use adhesive reflective targets
You can measure without a target, aiming the total station straight at the concrete in reflectorless mode. The problem is that in monitoring you need to measure exactly the same point in every campaign, sometimes for months, and sometimes with different operators. A target solves this:
- The point is physically marked. The center cross of the target is the point. Nobody has to guess where the previous campaign aimed.
- Pointing is repeatable. Aiming at the center of a cross is far more repeatable than aiming at a spot on a wall.
- Signal return improves. Reflective sheeting returns much more signal than concrete, plaster or paint, especially at longer distances and at poor angles.
- It is cheap and quick to install. You can spread dozens of points across the site without drilling into the structure or mounting brackets.
Which target size to choose
The rule of thumb: the target must look large enough in the telescope for you to point at its center comfortably, and large enough for the EDM to measure reliably. If in doubt between two sizes, go with the larger one.
- 2 and 3 cm: short distances and tight spaces, such as warehouses, indoor areas, steel structures and small components.
- 4 and 5 cm: general use on site, for columns, walls and facades at medium distances.
- 6 cm: longer distances, poorer angles of incidence or when the light makes pointing difficult. This is the standard size (60 × 60 mm) that total station manufacturers use to state the range on reflective tape.
The actual range depends on the total station model. Look in the manual for the range "on reflective tape" or "reflective sheet", and set the instrument to that target type, with the constant given by the manufacturer.
Step-by-step total station monitoring
1. Plan the points
Split them into two groups. Control points go on the structures that may move: columns, beams, walls and the top of the retaining wall. Reference points are placed outside the zone of influence of the work, on stable structures, and they are what tell you whether the total station itself is in the right place. Use at least three reference points, well distributed around the area.
2. Install the targets
Clean the surface (no dust, grease or loose plaster), let it dry and stick the target on, pressing the edges down firmly. Face the target toward where the total station will stand: the more perpendicular it is to the line of sight, the better the measurement. On corners and on surfaces that do not face the instrument, an angled bracket helps. Number each point, photograph it and note its location on a sketch.
3. Fix the instrument position
The ideal is a pillar with forced centering, where the total station always sits in the same place. Without a pillar, use a well-marked point or do a free station (resection) on the reference points in every campaign. What matters is that the station is always determined in the same way.
4. Take the baseline reading
Measure all points in more than one set, in both faces of the telescope, and use the mean. Enter temperature and pressure for the atmospheric correction of the distance. This campaign is worth more than any other: an error in the baseline reading shows up as displacement in every campaign that follows.
5. Repeat the campaigns with the same routine
Same instrument, same station position, same order of points and, if possible, the same time of day. Start and end each campaign by measuring the reference points: if they have "moved", the problem is with the station, not with the structure.
6. Calculate the displacements
For each point, compare with the baseline reading: ΔN, ΔE and ΔH (elevation). The total horizontal displacement is the square root of ΔN² + ΔE², and its direction is an azimuth; the azimuth and distance calculator works this out from the two coordinates. Plot each point on a displacement × date chart: trends are much easier to spot on a chart than in a table.
Precautions that make a difference to the result
- Sun and heat: heated air close to the ground and to facades bends the line of sight. Avoid grazing sight lines over hot asphalt and measure at similar times of day.
- Angle of incidence: a target tilted too far from the line of sight degrades both the distance and the pointing. Reposition the target instead of forcing the measurement.
- A damaged target is a new point: if a target is torn off or replaced, the point starts over with a new baseline reading. Never compare the measurement of the new target with the baseline reading of the old one.
- Protect the points: tell the site crew, flag the targets and check in every campaign that they are intact and firmly stuck.
- Close the control traverse: if the reference points were established by traversing, check the closure with the traverse closure calculator before using them.
Frequently asked questions
How often should I measure?
It depends on the construction stage and on what the designer specified. During excavation, dewatering or loading, campaigns are usually closer together (weekly, or even daily in critical situations); once the displacements stabilize, the interval grows. The displacement × time curve is what shows whether you can space them out.
What is the difference between a control point and a reference point?
The control point is on the structure you want to watch and may move. The reference point is outside the zone of influence of the work and should stay still; it is what guarantees that the total station was set up the same way in every campaign.
Does a total station replace leveling for settlement?
For small settlements, not completely. Precise differential leveling measures elevation with much higher precision. The total station comes in where the staff cannot reach and where horizontal displacement also matters.
Can I use the adhesive target for backsight and foresight points?
Yes. A target stuck on a fixed point (wall, pole, column) serves as a backsight to orient the total station always in the same way, which is useful on urban sites and inside warehouses, where you cannot leave a stake in the ground.